...a long time ago...about 25 years ago actually I made a lifesize rc R2 out of cardboard, sweat and a lot of tape. It made it through one sf convention before I had to mothball it because of rain the very next day, lol. Now after a long thought process over the years and after visiting so many conventions (last being the celebration III and IV). I decided this is it. I love a challenge, I've love the entire astrodroid concept as well as Star Wars (of course) and face it R2's the real hero. So this is my attempt to recreate a hero to us all R2-D2 as well as a newer hero R2-R9. Fell free to leave comments and tips....Best Regards Thomas
 

Sunday, January 27, 2008

Waiting for the glue to dry...

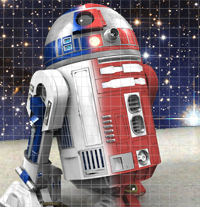
I finally got that glue I needed. I bought a few extra tubes, just in case. All I can do for now is wait for the glue to harden. I figured if I do the gluing now it should be totally hard by the time I get back from my little trip to Standford, CA. No real pictures to post this time but so far so good. While in the US, besides work, I'll be picking up a bunch of hard (hard to get in Sweden) to get goodies. The things that are waiting for me there are:

- 2 Vex transmitters/receivers
- 2 Vex signal splitters
- 4sets Vex crystals
- 2 Rocklers
- 2 Pittman motors for the dome rotation
- 20ft of 2.5mm optic fibers

I can only give a very big thanks To Calvin for helping me with the finding and ordering of most of these things. Because many of the companies in the US aren't adapted for international orders getting these things wasn't easy. But Calvin's contribution made it all very simple. A great thanks to Vin as well at R2builders for ordering the Vex transmitters. All of this kind of feels like Christmas all over again, lol.

Anyway, while I'm in the US I also plan to pick Chris's brain about his artoo. I'll be visiting him to get some close-up pictures of his artoo as well ;)

Sunday, January 20, 2008

Plexiglass-man strikes again...

The glue that I use for my frame and skin is on back order until friday. I guess everyone has a use for it, lol. Anyway, I thought I'd do some minor building this weekend because I have to soon prepare for my trip to the states. So I was testing 3 million and 1 ways to make that "hole" board for front and rear logic displays. I tried single-layered cardboard, double-layered cardboard, different types of wood but in the end... remember all of that plexiglass I have lying around...well. I desided to give it a try and wow. I printed out the hole setup on thick paper then using the paper as a template I carefully drilled the holes through both paper and plexiglass. Yepp, dremel has 101 uses as well. I think the results look pretty good. All I have to do is paint them. The r2builders club already has a styroman, so I guess you guys will be calling me "plexiglass-man", lol. Everyday, I discover lots of uses for this stuff in my artoo build. I'm even considering making my legs out of a wooden frame but with a plexiglass shell ;)

Monday, January 14, 2008

Great tempo until the glue ran out...

So far so good! I added these progress pictures so you can see where I'm at. I hope they give you a feel for the process. Believe me, this IS fun!! The first artoo is skinned but the glue ran out on the second, so I have to wait a few days before I can finish "him". This little break gives me sometime to straighten up my little "droid workshop". It’s amazing, if one doesn’t pick up after each session, how things accumulate everywhere, lol. Anyway, as you can see the skin is made of a very strong yet flexible Plexiglas that’s 2 mm thick. I found it to be about the same weight as wood with the same thickness but extremely flexible. Another great thing with using plexiglas is that I just placed the drawing (blueprints) underneath and just trace. Once the skins have hardened onto the frame I just etch away the line details. Certain areas like the doors, vents and so forth will require that I cut away whole parts and then glue another plexiglas layer from the inside of the “body”. But that won’t happen until after I return from the USA business trip.


Saturday, January 12, 2008

the skins are taking a while but...

Yea, it takes a while to position these things on the frame but I'm having a great time. This is actually fun! Meanwhile I desided to begin preparation for cutting into the dome so I made a dremel cutting guide out of 2 metal handsaw blades mounted on a flexable plastic strip. I did a quick test and it will work like a charm. I'm also using a dremel diamond tip blade. Costs more than the ceramic blades but lasts a lot longer and no risk of dangerous broken projectiles ;)


Thursday, January 10, 2008

working at a good pace...

So for so good! The frames were complete enough to begin working on the skins. I'm gluing them on with "maxi bond". It's kind of like bondo, takes about 10-12 hours to completely harden but when it does the skins really sit there for good. Your next question is probably...what material is the skin made of. Well thats a little secret until I have all the skins mounted of both artoos'. A little hint is that its not metal nor wood, but very strong ;) This has and will take a few nights to complete so in between the "gluing sessions" I'm testing a radical lighting idea for the front and rear logic lights. I mentioned earlier about thinking out of the box, well this is really a different approach. Also a serect until I bench test. All I can say is that its looking both promissing and inexpensive.

Sunday, January 6, 2008

No you're not seeing double...

I had a pretty good tempo this weekend and finished the basic frame structures to both artoo. All in all about 8-10 working hours, from sawing, swearing, re-sawing, putting together, glueing, touching, swearing, re-putting together and re-glueing. I'll let the glue dry this time before I begin setting in the screws, lol. I'm pretty prowd of myself considering I had to make 8 identical rings and matching beams. And to top it all off that crate of band-aids was pretty much bored the entire weekend, lol.... I guess this offically marks the start of the body building process, yippy!


...more to come

Friday, January 4, 2008

yikes..the first big weekend....

Well, I have 2 big weekends coming up for this project. The holiday relatives have finally left, the phone will be off the hook, kids are away, the final cutting tools are in place and a crate of band-aids are in the ready ;) This weekend I'm going to try and scatch build 2 artoo frames (wooden) at the same time, yikes. If all goes well, thats a big if, I can start on the dome the following weekend... I'll keep you guys posted but prayers are welcomed ;)

Thursday, January 3, 2008

new dome electronics... new problems...


With a new year comes new problems, lol. This christmas I got some new PSI flasher kits for my front and back logic displays so I decided to solder them up and watch the blinking lights, lol. Well, the lights came on, so I must have done something right, but no blinking. I re-check everything and added a little extra solder just to be sure, but nope. I then tried soldering a mini led flasher (2 LEDS) which is intended for my PSI display and it worked like a charm. I then went back to the non-working PSI flasher and checked and re-checked but nothing. Am I possibly connecting the battery to the wrong parts or is this just a bad PSI board? In the pictures the blue are positive and brown negative. Has anyone a suggetion?